This document explains how to configure calendars and contacts using CalDAV and CardDAV on Apple® and Linux® desktop systems, as well as on Apple mobile devices
How to Set Up Calendars and Contacts
Setting Up CalDAV and CardDAV for cPanel Calendars and Contacts
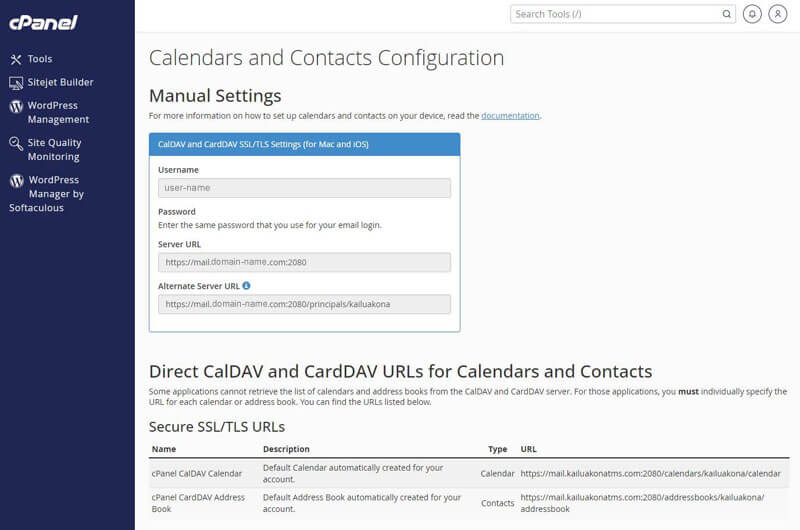
You can configure your cPanel calendars (CalDAV) and contacts (CardDAV) using the Webmail » Calendars and Contacts Configuration interface.
Here, you'll find all the necessary setup details, including:
- Username: "[email protected]
- Password: Use your Webmail login password
- Server URL: "https://example.com:2080"
- Alternate Server URL: "https://example.com:2080/principals/[email protected]/"
Note: Some apps don’t support Autodiscover. If the Server URL fails, use the Alternate Server URL instead.
You can also access individual calendar and contact URLs in the Direct CalDAV and CardDAV URLs for Calendars and Contacts section:
- Calendar: "https://example.com:2080/calendars/[email protected]/calendar"
- Address Book: "https://example.com:2080/addressbooks/[email protected]/addressbook:"
To simplify setup, you can have Webmail send you configuration scripts. Refer to Set up email on your device in the *Webmail Interface documentation*.
Configuration Instructions by Platform
iOS®
Note: If your server uses a self-signed SSL certificate:
- You may see a warning that the server identity can't be verified. Tap Continue to proceed.
- The Reminders app won’t work with these calendars.
Access Setup Screen:
1. Go to Settings > Mail > Accounts > Add Account > Other
2. Choose:
- Add CalDAV Account under *Calendars*
- Add CardDAV Account under *Contacts*
Enter Account Info:
- Server: "example.com:2080" *(include ":2080")*
- Username: "[email protected]"
- Password: Your Webmail password
- Description: e.g., *My Calendar Account*
3. Tap Next, enable Calendars or Contacts
4. Tap Keep on My iPhone or Delete, then Save
macOS®
Access Configuration Menu:
1. Open Launchpad > System Settings > Internet Accounts
2. Click Add Other Account…
3. Select CalDAV Account or CardDAV Account
Setup Options:
Automatic
Not supported for CardDAV or if using self-signed certificates
- Choose Automatic
- Enter your email and password
- Click Sign In
Manual
- Choose Manual
- Username: "[email protected]"
- Password: Your Webmail password
- Server Address: "example.com:2080" *(include ":2080")*
- Click Sign In
Advanced
- Choose Advanced
- Username / Password as above
- Server Address: "example.com"
- Server Path: Use paths from Webmail (e.g., "/calendars/[email protected]/calendar")
- Port: "2080"
- Click Sign In
Linux (Thunderbird Recommended)
Set Up Calendars:
1. Open Calendars in Thunderbird
2. Click New Calendar > On the Network > Next
3. Fill in:
- Username: "[email protected]"
- Location: "https://example.com:2080" *(must include ":2080")*
4. Click Find Calendars, enter your password when prompted
5. Ensure CalDAV and the correct calendar are selected
6. Click Subscribe
Set Up Contacts:
1. Open Address Book
2. Click Create New Address Book > Add CardDAV Address Book
3. Fill in:
- Username: "[email protected]"
- Location: "https://example.com:2080"
4. Click Continue, enter your password when prompted
5. Make sure the cPanel CardDAV Address Book is selected
6. Click Continue
